Today, for a little change in pace, I’m going to take you through my process for evaluating a kimono when I receive it. So the “where do I begin” is actually pretty literal–this is where I start every time I bring a new (LOL–new to me) item in. I’ve been asked this a few times, I think that it’s because people want to get better at evaluating kimono for purchases by themselves. That’s my best guess, anyway; I don’t typically ask why someone’s seeking information from me unless the answer can be weaponized. At which point plausible deniability is kind of important to me.
Did you know a number of the solvents that I use can be mixed to make mustard gas? Do not do that.
Moving on.
To start with, I recommend that unless you have an insane amount of confidence or are hugely masochistic–or both, fuck it, let’s party–inspect the item for the things I’m going to go over as closely as you can before you throw money at it. I realize that can be a hard ask. Before the indoor times (HAHAHA PLAGUE), I had several opportunities to inspect kimono and komono (not a typo–komono are items used in wearing of kimono) live and in person before I made the decision to buy. But, especially now, it’s usually just my face entirely too close to whatever screen a seller’s photo is being reviewed on, and playing the “is that a shadow or a hole” game.
Usually it’s neither; it’s a stain.
Since I’m not happy unless I’m torturing myself and I’m brimming with the unearned confidence that only an IT professional could have, I take lots of shots in the dark. I can’t say as I always recommend it. Do take your risks wisely. I did stumble ass backward into a hikizuri (dance kimono) this way, so if I told you it doesn’t work out for me, that would be bullshit. I guess this few paragraphs of rambling exists to tell you that if you’re going to play the game that way, then you need to be prepared to lose.
The seller of this kimono that I’ll be evaluating for this entry might be reading along. My regular readers are already buckled in for my whimsical fuckery and my colorful strings of hard R expletives. But this is a moment where I remind everyone reading that I am dealing in antiques that have come a very long distance, time and land, to be with me. My experience with the seller of this kimono was an absolute delight, I’m nothing but happy about having this kimono, and if I point out things that were not mentioned in the original listing–and there will be things because there always are–it is not at all intended as a complaint.
This shit is complicated. I have to walk a line between being honest about the experience of buying domestically and the understanding that deliberate deception is exceptionally rare. It’s so very important to me that people understand that I do not see the presence of these flaws as signs I have been misled. I think in the decade I’ve been fucking around with this, I’ve only been deliberately lied to about condition one time. (That piece is at the bottom of the fucking box thinking about what it did.)
Anyway! Let’s get started.
Without getting really fucking technical, and we will eventually, this is a kurotomesode (black formal women’s kimono with five crests and pattern on the hem) that is at least Pre-WWII.

How did I come to that conclusion? I’m glad you asked! Mostly it’s the red lining. With the exception of things like uchikake (ornate and heavily padded/trailing wedding kimono), red linings fell hard out of fashion during WWII. Now, it’s worth noting that enough people must have either given negative fucks about that, or otherwise a lot of kimono were tucked away instead of being repurposed or having their linings replaced–because otherwise, we wouldn’t have this feature to help us date them, now would we?

Another good way to date something is to have a peeky-peek at the size of the kamon (family crests). By the way, in many instances out there you’ll see “kamon” also referred to as just “mon.” I tend to say the whole thing not because it’s correct to do so, but because I’m a goddamn dork. Now you know. Yay.

I’m using a little kamon replacement applique that I pulled off of this kimono for the size comparison here, because it is the size of contemporary kamon. It makes for a pretty handy comparison tool. They’re approximately the same size, so I feel pretty confident saying that this is either a later Taisho or earlier Showa piece. I’ll slap my trusty “antique” label on it, because I don’t have good provenance that lines up with the details of the kimono itself.
Now I’m making a pretty deliberate decision not to go insane with the details about this specific kind of kimono, because there’s a lot of weirdness and regional differences on things once you get into event specific kimono. Suffice to say, that this kimono is classy as fuck. Why is this? Because the pattern continues on the inside of the hakkake (inside lining of the skirt), it has thicc hemlines, and it has a hiyoku (in this context, partial second layer) sewn in.

I brought that up because having these features adds some fucking class and style to basically anything, and this one has it. Which means that this might have belonged to the bride as opposed to her mother. See this old as photo for why I say that:

Now I’m going to abandon that line because it’s important to categorize something when we’re assessing for condition, because formality and overall construction is going to give us a good idea of what kinds of materials and techniques were used to create the damn thing in the first place. And that’s data that becomes pretty handy when you’re trying to fix it rather than make a bigger mess.
Once I’ve categorized something as best I can–which to me actually just means making a note of the details of a specific kimono rather than always slapping a specific label on it, as antiques don’t like contemporary labels all the time–it’s time to start evaluating condition.
You’ll notice really fast if there’s a smell, so I don’t think you need my ass explaining that part. I recommend hanging the kimono up on something with a nice wide bar on it so that you can have the sleeves fully extended. A simple dowel rod works if you’re not interested in spending the money on an iko (kimono stand).
Now we hunt for damage. -Shotgun chk-chk-
I do this in stages, and we’ll start with things that involve the structural integrity of the kimono. Things like tears, holes, splitting seams, embroidery issues, and shattering. For this stuff, I move up and down the kimono, panel by panel, with a bright light and move it around a bit to test the seams and look for anything hanging off of it. You’ll catch tears, broken embroidery/couching, holes, or shattering in this way pretty quickly. All of those things will severely disrupt the topography of the kimono, so moving panel by panel and giving it a tug every little bit reveals a lot. Don’t yank too hard, obviously.
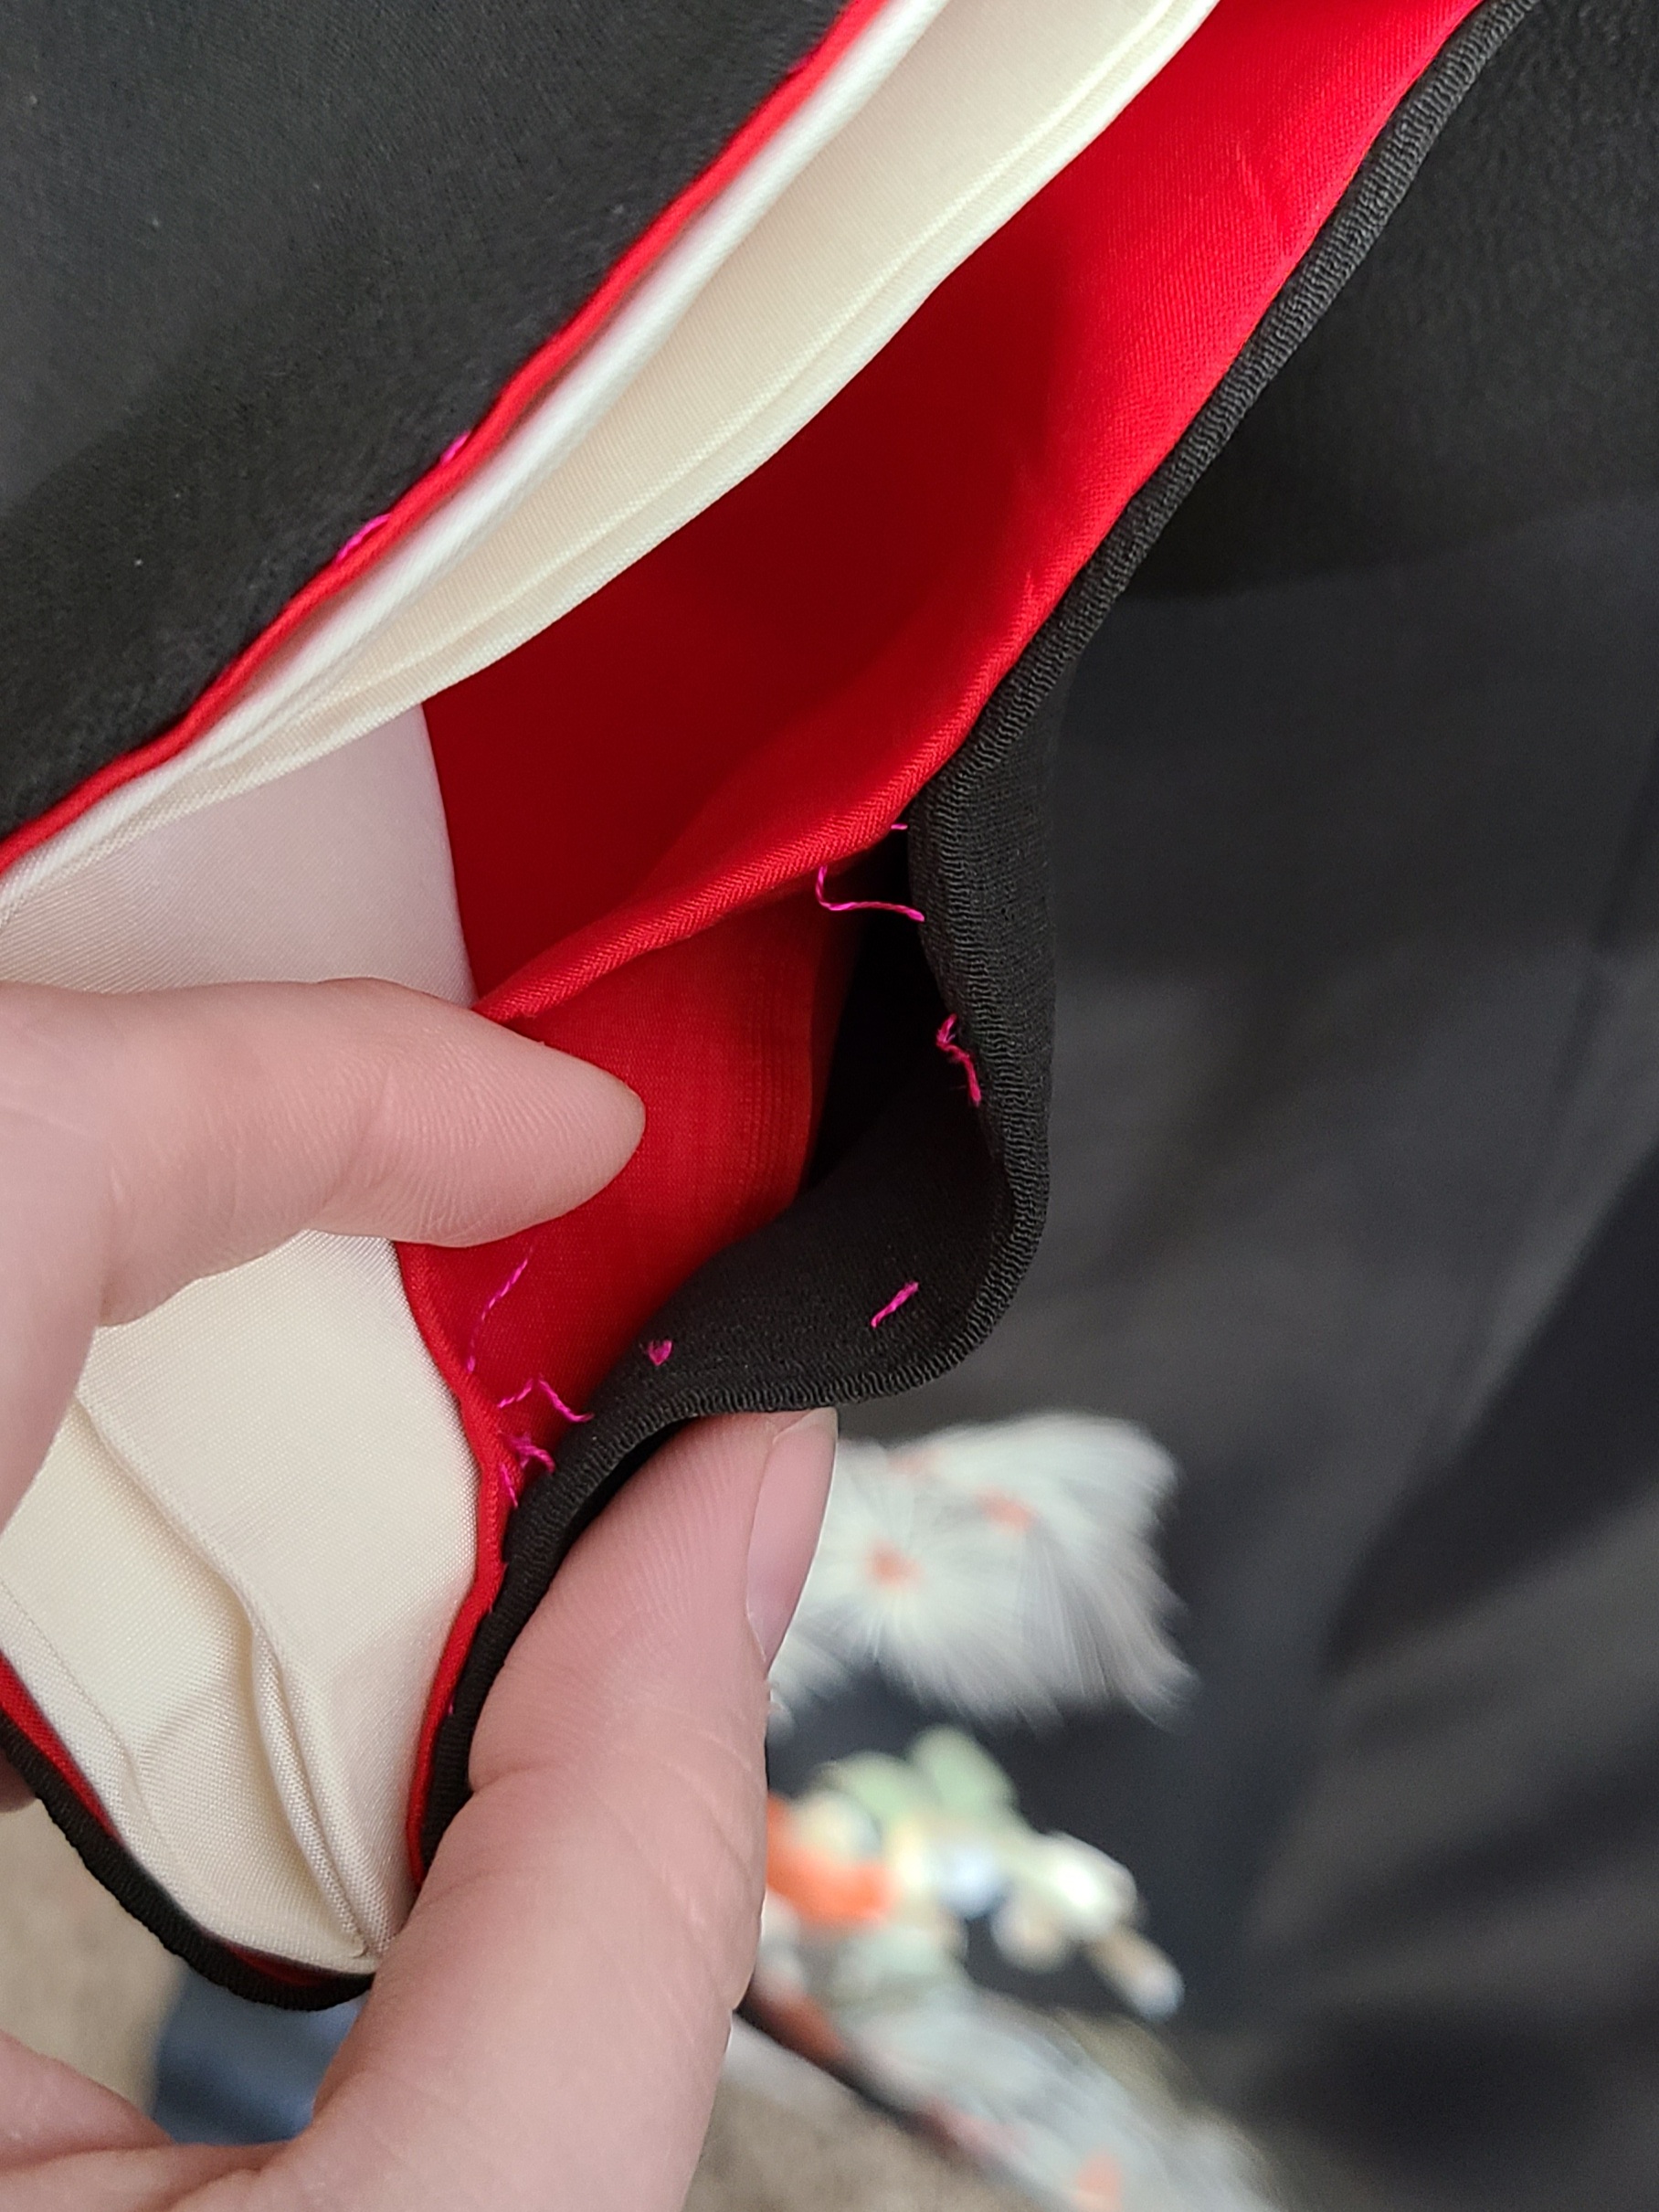
Sleeves are most often the item that need seam repairs. Hell, I think I can count on one hand the number of kimono that I’ve received that didn’t at least need a little bit of correction where the sleeves attach to the shoulder. It’s a stress point, so take a good hard look at the shell and the lining for problems.
I often find attempts at repairs to this area that actually make the problem worse than it would have been. Sometimes you’ll find that the original stitch holes have been torn wider. That’s correctable, which is nice, but it’s a frequent guest so look hard. This kimono displays this issue as well, to a very small degree.

I also found that someone once did a great job repairing the joining of the lining to the shell:

But the knot they used to tie off that seam has failed somewhere, or otherwise the thread broke so I’ll have to redo it. But because of this little slot, I can see that there’s a good few centimeters of sleeve sewn up into the seam! Antique items often have this, where someone shortened the sleeve drop. They did it for the hiyoku too. I’ll be going in and letting that seam allowance back out because I am an absolute sucker for those Pre-WWII/ Taisho Romance long-ass sleeves.
This is usually where I decide to do my fabric material check. These things don’t ship with labels, so you have to figure out what it’s made of. I often reference the “burn test” for this, and that squicks people out a lot. But I assure you, this does not damage the kimono. Since we have a nice little open seam right here, I’m going to pluck a bit of material from the very end of the black inside of the seam allowance. YOINK:


When I’m done with this piece, the donor area will still be well inside of the seam allowance, and this tiny clipping does not pose any danger to the structural integrity of the fabric. Now we get to set it the fuck on fire!

If it burns a bit slow and leaves something of dusty clumpy mess that crumbles, you have silk. Behold:


Knowing definitively what your kimono is made of is going to help you when it comes time to do any kind of repairing to it. The materials used change what kinds of solvents, heat settings, dyes, or paints you might want to use to restore/correct/remove/whatever. Got a polyester juban (underwear kimono)? You can probably bleach that. Got a white silk kimono with a bunch of black marks on it? Bleach will eat the fabric–but if you neutralize it fast enough, you’ll just turn it fucking tan-ish yellow for FOREVER, and that’s not correctable.
You’ll see stains while you’re doing your structural integrity checks, but I actually save the hardcore inspection for the second pass. Then it’s up and down again. If they’re really faint or small, or there’s just a lot of them, I might have a notepad or something so that I can take notes on where and what I’m seeing. Yup, you guessed it–this is the part where we identify some stains. This kimono has quite a few stains, and none of them were detailed beyond being in the photos in the original listing. Let’s play “The fuck is this?”
Up here on the back of this piece, we have some splattering on the black silk. And the first thing I do with any stain is to kind of roll the fabric around between my fingers to see how it sits. Surprisingly often, shit just crumbles off or can otherwise be removed with a fingernail/lint roller. That’s happening here, too. Most of these little splotches, I think, were some kind of actual dirt. Like from the ground.

But whatever else was in the dirt did not like the dye used for this kimono, and while some of them scraped right off and I’ll never have to worry about them ever again, some of them left behind a mark. I’ll have to address those spots with dye.
Speaking of dye, I have my big blaring lights on for inspection purposes. Up on the main picture way at the top there, it looks like this kimono is suffering from some fading. It’s actually not, that’s a trick of my lights. She’s dark as fuck in person.
Moving right along, I inspect the crests for any dye bleed or staining. These look good.

A little further down, and we have whatever in the fuck this is. It’s waxy. It has the consistency of a wax pencil–maybe makeup or a crayon. It doesn’t want to scrape off gently, so I’ll probably have to attack that with something a little more aggressive. I have totally gotten away with using makeup removing cloths to get rid of shit like this before, but make sure you test that on an inseam first–never experiment in visible spots.

Now as we come down, we don’t have any embroidery on this piece. It’s a delightful yuzen (resist dye technique) picture that has been accented with a crap ton of kinsai (gold paint). This kinsai is also detailed with a little bit of silver, and it looks to be in fantastic shape.

We have some brown spots on the tsuru (cranes), some of the flowers–well basically anything that’s white. They’re on the tsubaki (camellia) blooms, too. They’re not topical stains like the dirt was, so these are going to require intervention with a solvent.


The stains continue into the inside, on the hakkake. As we move from white spaces back to the black silk, it becomes like those same splatters that were up near the top of the garment on the back. I’m getting more and more convinced that this is actually just legit mud. Some of them scratch off, too.


Since I didn’t find any issues with the lining, I moved on. Now we’re inspecting the hiyoku. Right away, I can see that it’s having the same splatter problem that the rest of the kimono is having. Fucker went dirt biking or some shit, I guess. I don’t know, I’ve never planned a wedding.

I think the stains that don’t scratch off are probably at least related to the ones that do. This is the part where I do some mild troubleshooting to figure out what it is I’m dealing with by smashing all of my five senses against it and seeing what sticks. The ones that can’t be scratched away don’t have a texture difference from the silk; they’re not rough or stiff at all. They don’t smell like anything dry–I keep purified or distilled water handy for things like this, because sometimes if you just dab your finger in some water and get one of these little stains wet, you can smell what it was. Most of the time it doesn’t do shit, though. I still do it, because if the stain reacts at all to the water, for example spreading or smelling or whatever, then the stain itself isn’t colorfast. That’s a wonderful thing, but having an absorbent cloth at the ready to suck up any mobile stain is a must.
So I did it. I did the thing. I lifted that hem up and -BLEP-
It didn’t taste like much of anything. Sometimes things don’t. It’s probably dirt then. Now as I consider this hiyoku…
My dear readers, some of you have been with me since the beginning. You’ve spent this whole time while I’ve described these stains waiting for my inner goddamn psychopath to come out and lick some shit. And this will be a day that I either deeply disappoint you or make you very proud, because I’m not licking this. Because you see, I fully believe that each and every one of us filthy humans has a line in the goddamn sand, and this one is mine. This is the part of a kimono I will never lick. Because you know what? I’m good. I can guess.

Moving right the fuck along, with our inspection, I move up the front panels of the body, and there actually wasn’t anything particularly interesting about them. I’m thinking that while this kimono had its stay in the USA, if it was worn much, it was worn open and not with an obi (belt). Just a hunch. Anyway, what I did find was either some fading or some gunk on the collar. It can be hard to tell in this spot sometimes until you treat it. You see, if you’re not familiar, kimono collars like this are meant to be worn folded approximately in half INWARD, as opposed to outward. You will not see any of the lining when it’s worn properly. This means that the collar might make contact with the skin at some point, and it means that oftentimes you’ll get makeup or sweat stains on the folding line of the collar. I can handle that. And I don’t even have to lick it.

Aaaand, I think that actually pretty much concludes my inspection. I have a note of what all is wrong, what I need to do to correct things, and at least a vague idea of what I’m up against in most places. I realize this probably wasn’t the most entertaining or educational walkthrough I’ve done of anything, but I hope that talking about the attention to detail I pay to such things helps to give you a better eye on what to look out for when making your selections.
BYE.

Thank you!! I am learning so much from your posts. And I find the salty language funny as heck. (Not cursing because this is my business account. LOL!)
LikeLike